Why Disable VPN: Understanding the Reasons
A Virtual Private Network (VPN) is a valuable tool for protecting your online privacy and security. However, there may be times when you want to disable your VPN for various reasons.
One reason you may want to disable your VPN is to access geo-restricted content. Some websites or services may be inaccessible when you’re using a VPN, so disabling it may allow you to access that content.
Another reason could be related to network performance. While VPNs are generally reliable, sometimes they can slow down your internet connection or cause connection issues. Disabling your VPN can help to restore your internet speeds and fix connection issues.
Finally, you may need to disable your VPN to troubleshoot issues with specific apps or websites. Some applications may not work properly with a VPN, so disabling it can help resolve any compatibility issues.
In conclusion, while VPNs are useful tools for protecting your online privacy and security, there are valid reasons why you may want to disable them. It’s important to understand these reasons and know how to disable your VPN safely and effectively.
How to Disable VPN on Windows 10
Disabling a VPN on Windows 10 is a straightforward process that can be completed in just a few steps.
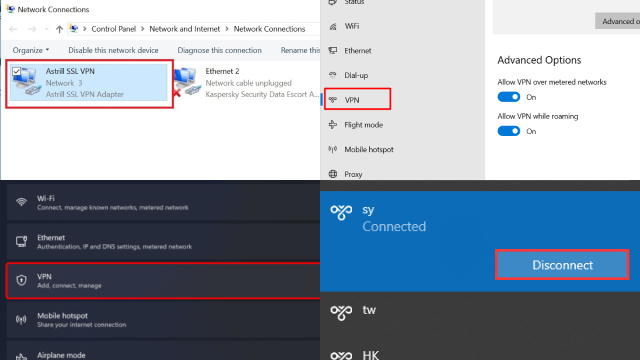
First, locate the VPN icon in the taskbar on the bottom right of your screen. Right-click on the icon and select “Disconnect” from the drop-down menu. This will disconnect your VPN connection.
If you can’t find the VPN icon in the taskbar, you can also disable your VPN through the Settings app. Open the Settings app and select “Network & Internet.” Click on “VPN” from the left-hand menu and select the VPN connection you want to disable. Click on “Disconnect” to disable the VPN connection.
If you want to completely remove the VPN connection from your computer, go to the Settings app and select “Network & Internet.” Click on “VPN” from the left-hand menu and select the VPN connection you want to remove. Click on “Remove” to delete the VPN connection from your computer.
In summary, disabling a VPN on Windows 10 is a simple process that can be done through the taskbar or the Settings app.
How to Disable VPN on Mac OS
Disabling a VPN on a Mac OS computer is a quick and easy process that can be done in a few steps.
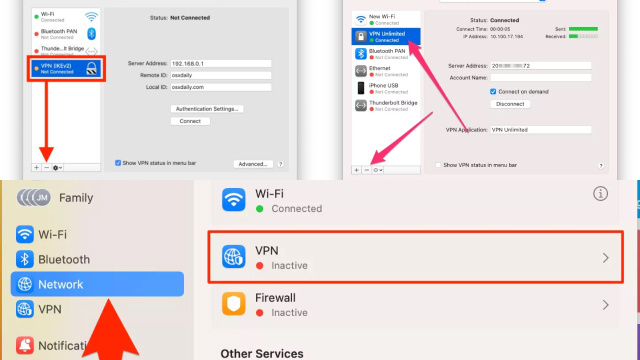
First, locate the VPN icon in the menu bar at the top of your screen. Click on the VPN icon and select “Disconnect” from the drop-down menu. This will disable your VPN connection.
If you can’t find the VPN icon in the menu bar, you can also disable your VPN through the System Preferences. Open the System Preferences and select “Network.” Click on the VPN connection you want to disable and then click on the “Disconnect” button.
To completely remove the VPN connection from your Mac, go to the System Preferences and select “Network.” Click on the VPN connection you want to remove and then click on the “-” button at the bottom of the window. This will delete the VPN connection from your computer.
In conclusion, disabling a VPN on a Mac OS computer is a simple process that can be done through the menu bar or the System Preferences.
How to Disable VPN on Android Devices
If you’re using a VPN on your Android device and need to disable it for any reason, the process is straightforward and can be done in just a few steps.
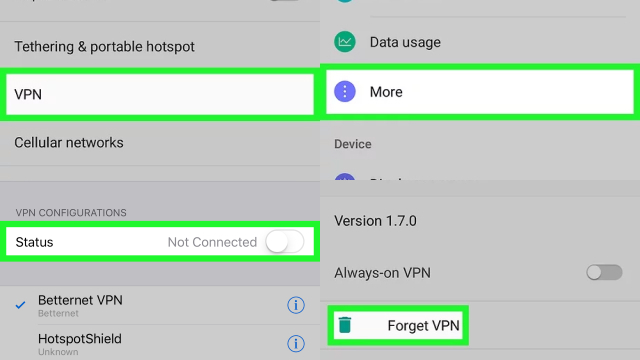
First, go to the “Settings” app on your Android device and select “Network & internet.”
Next, select “VPN” from the list of options. You will see a list of VPN connections that are currently set up on your device.
Tap on the VPN connection that you want to disable and select “Disconnect.” This will disable the VPN connection on your Android device.
If you want to completely remove the VPN connection from your device, go back to the “VPN” screen and tap on the gear icon next to the VPN connection you want to remove. Then select “Delete” to remove the VPN connection from your device.
In conclusion, disabling a VPN on an Android device is a simple process that can be done through the “Settings” app. Just select the VPN connection you want to disable and click on “Disconnect.”
How to Disable VPN on iOS Devices
Disabling a VPN on an iOS device is a quick and easy process. Here are the steps to follow:
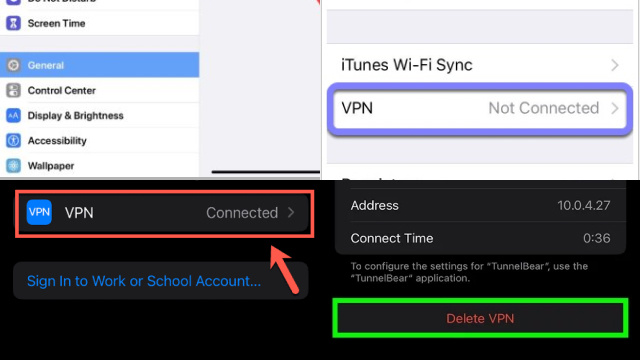
- Open the “Settings” app on your iOS device.
- Scroll down and select “General.”
- Tap on “VPN” from the list of options.
- You will see a list of VPN connections that are currently set up on your device. Tap on the VPN connection you want to disable.
- Finally, toggle the “Status” switch to the “Off” position.
That’s it! Your VPN connection is now disabled on your iOS device.
If you want to remove the VPN connection completely from your device, go back to the “VPN” screen and tap on the “i” icon next to the VPN connection you want to remove. Then select “Delete VPN” and confirm your choice.
It’s important to note that disabling your VPN may expose your internet traffic to potential security threats. So, if you’re turning off your VPN for a specific reason, make sure you turn it back on as soon as possible to maintain your online privacy and security.
Common Issues When Disabling VPN and How to Solve Them
Disabling a VPN can sometimes cause issues, especially if you’re not familiar with the process. Here are some common issues that can arise when disabling a VPN, and how to solve them:
- Internet connection issues: If you experience internet connection issues after disabling your VPN, try resetting your network settings or restarting your device.
- DNS leaks: Sometimes, disabling a VPN can cause DNS leaks, which can expose your online activity to potential security threats. To prevent this, make sure to clear your DNS cache after disabling your VPN.
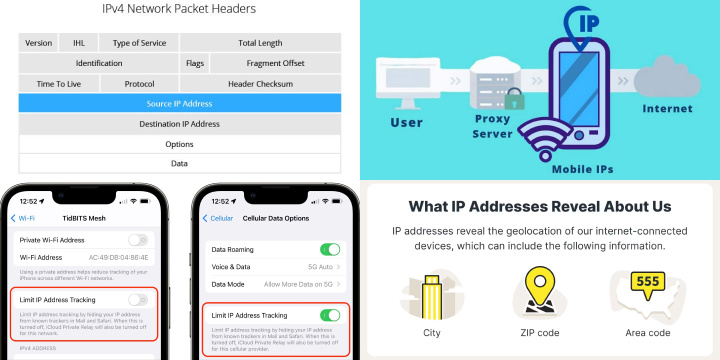
- IP address leaks: Disabling a VPN can also result in IP address leaks, which can reveal your true location to websites and services. To avoid this, consider using a dedicated IP address or enabling your VPN’s kill switch feature to prevent accidental disconnections.
- Firewall issues: If you’re experiencing firewall issues after disabling your VPN, try temporarily disabling your firewall or adding exceptions for the applications you’re using.
- Third-party software conflicts: Disabling a VPN can sometimes conflict with other third-party software installed on your device. If you experience any issues, try disabling any conflicting software temporarily.
By being aware of these common issues and following these solutions, you can avoid potential problems when disabling your VPN and ensure that your online activity remains safe and secure.
When Should You Re-Enable Your VPN: Tips for Staying Safe Online
Virtual Private Networks (VPNs) are an excellent way to secure your internet connection and protect your privacy online. However, there are times when you may need to disable your VPN.
For instance, you may need to access certain websites or services that are blocked by your VPN, or you may want to improve your internet speed. Whatever your reason, it’s important to understand when you should re-enable your VPN to stay safe online.
One situation where you should consider re-enabling your VPN is when you’re connecting to public Wi-Fi. Public Wi-Fi hotspots are often unsecured and pose a significant risk to your online security. By re-enabling your VPN, you can encrypt your internet traffic and protect your sensitive data from hackers and other cyber threats.
Another scenario where you should re-enable your VPN is when you’re downloading or sharing files. This is because VPNs can hide your IP address and prevent third parties from tracking your online activities. It’s especially important to use a VPN if you’re downloading copyrighted material or using peer-to-peer (P2P) networks.
Ultimately, the decision to re-enable your VPN depends on your specific online activities and security needs. If in doubt, it’s always best to err on the side of caution and keep your VPN enabled.
Ensuring Your Privacy: Clearing VPN Usage History and Cookies
Ensuring your privacy involves more than just using a VPN; it also requires managing your digital footprint effectively. Clearing VPN usage history and cookies is an essential step:
Clearing VPN Usage History:
1. VPN Logs: Check if your VPN service maintains logs of your online activity. Opt for VPN providers that have a strict no-logs policy to ensure no usage history is stored.
2. Browser History: Regularly clear your browser history to remove traces of websites visited while using a VPN. Most browsers offer options to clear history, cookies, and cached data.
3. Operating System Logs: Some operating systems may store VPN connection logs. Disable logging features or regularly delete these logs.
Clearing Cookies:
1. Browser Cookies: Cookies track your online behavior. Periodically delete cookies from your browser settings or use browser extensions to manage them.
2. VPN’s Built-in Features: Some VPNs offer built-in features to automatically clear cookies when you disconnect. Enable this option for added privacy.
3. Private Browsing Mode: Use your browser’s private or incognito mode to prevent cookies from being stored during a session.
4. Cookie Management Tools: Consider using third-party cookie management tools or extensions to control and delete cookies.
5. Regular Maintenance: Make clearing history and cookies a routine part of your online hygiene.
By clearing VPN usage history and cookies, you minimize the chances of your online activities being tracked and help maintain your privacy even while using a VPN.
Conclusion: Disabling Your VPN Safely and Effectively
In conclusion, disabling your VPN is a simple process that can be done in a few clicks. However, it is important to understand the reasons why you might need to disable your VPN and the potential risks associated with doing so.
Always ensure that you re-enable your VPN when you are finished with your sensitive online activities to protect your privacy and security. Remember to follow the steps outlined for your specific device to disable your VPN properly and avoid any common issues that may arise.
By taking these precautions and understanding the importance of VPN protection, you can stay safe and secure online while still enjoying the benefits of a VPN when needed.
