A virtual private network is a network-based connection that allows you to connect to a private network from outside of it. In simple terms, it is easy to use and you shouldn’t be intimidated by its settings. You can get this thing up and running in less than 10 minutes if you follow this tutorial. That’s all you need to know about setting it VPN for Windows 10.

How and why use a VPN?
There are several reasons for using such a feature:

# 1 Company requirement
Access to a private network. Often, a company or organization uses a private network with many internal servers and files that can only be accessed from a company’s PC that is located in your office. VPN will allow you to access these servers and files from your home PC or another remote PC, without jeopardizing corporate privacy, for example, while working from another place. Instead of being attached to your work computer, you may work from another location. Are you excited?
VPN gives access to any websites and networks
# 2 Data
Data transmission over a private network. When you connect via VPN, you are connecting to a specific server machine, on a private network that has an open interface. Once connected, all the internet activity goes through this PC, so web services treat you as a PC on this private network instead of your home computer.
# 3 Anonymity
The most common reason is hiding your internet activity. This is important even if you are not doing anything illegal. Tired of ads tracking your geo-position and search queries? Don’t want your ISP or regulatory agencies to track you? VPN encryption can hide your traffic. Using such a feature opens up many possibilities that you can take advantage of.

The most popular reason of VPN usage is to hide Internet activity
Setting up a VPN connection
Unlike its predecessors, the newest version of the OS developed by Microsoft has built-in VPN settings that greatly simplify the setup process. In this article, we will walk through the configuration process for the most popular L2TP protocol.
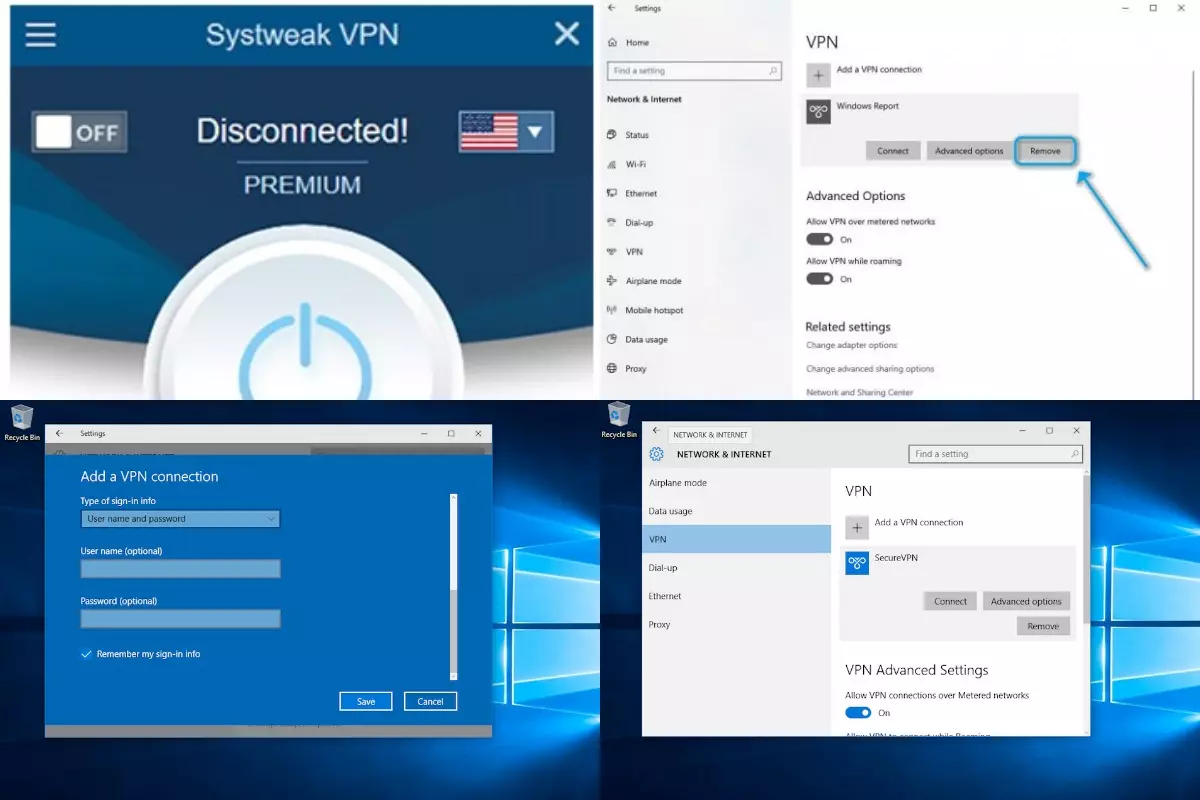
Configuring VPN for Windows 10 using standard system tools
We will make the configuration using the L2TP protocol as an example, after purchasing the tariff. Search for: “Change virtual private networks”, click and then click “Add VPN connection”.
The network settings are as follows:
- For “VPN providers” select “Windows (built-in)”.
- In “Connection Name”, enter a name for your VPN profile. For example, “Work”.
- For server name or address, enter the hostname or IP address of the necessary VPN server. You want to get this from your IT department or service provider.
- For VPN type, select L2TP / IPsec with pre-shared key and enter the shared key. The IT department or service provider must provide it.
- For “login type information”, enter the username and password provided
- Click “Save”.
After saving the profile, left-click on “Network icon” in the taskbar, select the necessary VPN profile you just created, then click Connect to start connecting to the VPN server.
After adding a new VPN service, you will have access to a list of servers that you can connect to. On the “control panel” page of most VPN services, the server location, the address required to create a connection, and the current server load are displayed.

VPN is quite simple to disable
Troubleshooting VPN Issues on Windows 10
Troubleshooting VPN issues on Windows 10 can be a challenging but necessary task to ensure your online security and privacy. When your VPN is not functioning correctly, it can expose your sensitive data and compromise your anonymity.
The first step in troubleshooting VPN problems is to identify the issue. Common problems include connection failures, slow speeds, and unexpected disconnections. Check your internet connection to ensure it’s stable and that there are no restrictions on VPN usage from your network or ISP.

Troubleshooting VPN

Next, verify your VPN settings, including the server location, protocol, and login credentials. Incorrect settings can lead to connectivity problems. Ensure that your VPN software is up-to-date, as outdated versions may have compatibility issues.
Firewall and antivirus software can also interfere with VPN connections. Adjust your security settings to allow your VPN to operate smoothly.
If you’re still facing issues, try switching to a different server location or protocol within your VPN client. Finally, consult your VPN provider’s customer support for specific guidance on resolving your problem.
Troubleshooting VPN issues may require some patience and technical know-how, but the effort is worth it to maintain your online privacy and security.
How to disable and uninstall VPN on Windows 10
If you no longer want to use VPN, or just to remove a server from the list, you may disable it or remove it entirely.
- Right-click the Start button and click Settings.
- Click “Network & Internet”.
- Click “VPN”.
- Click on the necessary connection, and click disconnect
- Click “Delete” and “Delete” again to confirm your actions. This completes the removal of VPN from Windows 10.