Reasons to Change Your VPN
Virtual Private Networks (VPNs) have become increasingly popular in recent years due to their ability to enhance online privacy and security. However, there are several reasons why you might need to change your VPN.
One common reason is to access geo-restricted content. Different countries have different laws and regulations that may restrict access to certain websites and services. Changing your VPN can allow you to bypass these restrictions and access the content you want.
Another reason is to improve your online security. Some VPNs may have security vulnerabilities or may not offer the level of encryption that you need. Changing your VPN to a more secure provider can give you peace of mind knowing that your online activities are protected.
Additionally, changing your VPN can also help you to avoid bandwidth throttling. Internet Service Providers (ISPs) may slow down your internet connection if they detect that you are using certain online services. By changing your VPN, you can mask your online activities and avoid bandwidth limitations.
Overall, changing your VPN can help you to enhance your online experience by providing you with better privacy, security, and access to restricted content.
Steps to Change Your VPN on Windows
Changing your VPN on Windows is a straightforward process that can be accomplished in just a few steps. Here’s a quick guide on how to do it:
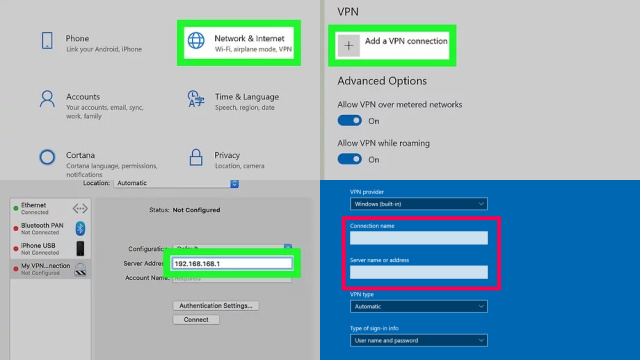
- Open the settings menu by clicking on the Start button and selecting the gear icon.
- Click on the Network & Internet option.
- Select the VPN tab from the left-hand menu.
- Click on the VPN connection that you want to change and then click on the Advanced options button.
- Scroll down to the bottom of the page and click on the Delete button to remove the existing VPN configuration.
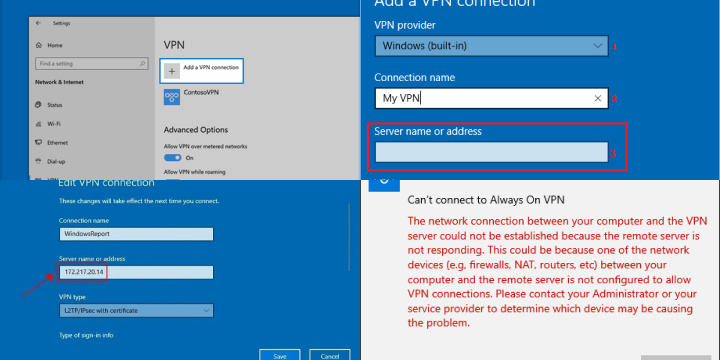
- To add a new VPN connection, click on the Add a VPN connection button.
- Fill in the necessary details for the new VPN connection, such as the server address, VPN type, and login credentials.
- Click on the Save button to save your new VPN connection.
By following these steps, you can change your VPN on Windows and ensure that you are connected to a secure and reliable VPN service.
Steps to Change Your VPN on Mac
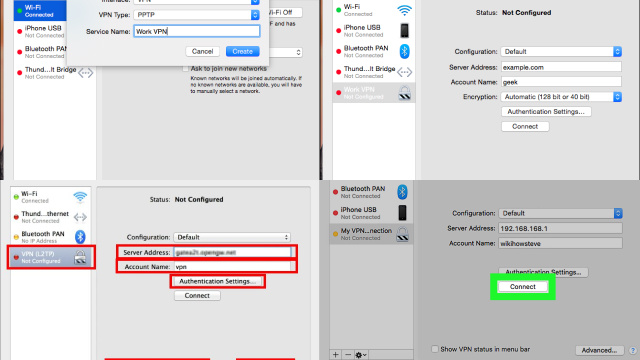
Changing your VPN on a Mac is a simple process that can be done in just a few steps. First, you need to open the System Preferences menu and then click on the Network icon. In the Network window, you will see a list of all the available network connections on your Mac, including your VPN connections.
To change your VPN, simply click on the VPN connection you want to use and then click the Connect button. If you need to add a new VPN connection, click the “+” button at the bottom of the list and follow the prompts to set up a new connection.
Once you have connected to your desired VPN, you can verify that it is working by checking your IP address and location. You can do this by visiting a website that displays your IP address and location information, such as WhatIsMyIP.com.
By following these simple steps, you can easily change your VPN on a Mac and enjoy the benefits of a secure and private internet connection.
Steps to Change Your VPN on Android
If you’re using an Android device, changing your VPN is a simple process. Follow these steps to change your VPN:
- Open the Settings app on your Android device.
- Scroll down and select “Network & internet.”
- Select “VPN” from the list of options.
- If you already have a VPN configured, tap on the name of the VPN you’re currently using. If not, tap the “+” icon in the top right corner to add a new VPN.
- You’ll be prompted to enter your VPN’s server address, as well as any login credentials if required. Enter the details and tap “Save” to connect to the new VPN.
That’s it! Once you’ve completed these steps, your Android device will be connected to the new VPN. Remember that changing your VPN can have an impact on your internet speeds and overall browsing experience, so make sure to choose a reliable and fast VPN provider.
Steps to Change Your VPN on iPhone or iPad
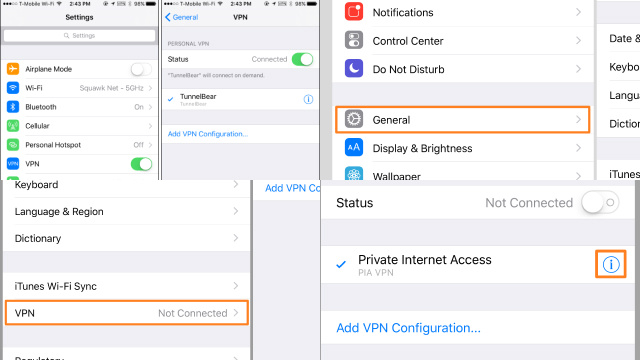
If you want to change your VPN on your iPhone or iPad, you can do it quickly and easily in just a few steps. First, open your device’s settings and tap on the “General” option. From there, scroll down until you find the “VPN” option and tap on it. If you already have a VPN configured, you will see the option to “Disconnect” or “Delete VPN.” If you want to delete it, tap on that option and confirm the action.
To add a new VPN, tap on the “Add VPN Configuration” option. You will then be prompted to enter your VPN details, including the type of VPN, server address, and any login credentials required. Once you have entered all the necessary information, tap on the “Done” button to save the new VPN configuration.
You can now turn on the VPN by toggling the “Status” switch to the “On” position. You can also choose to connect to the VPN automatically when you connect to a Wi-Fi network by turning on the “Auto-Connect” feature. That’s it – you have successfully changed your VPN on your iPhone or iPad.
Common Issues When Changing Your VPN
Changing your VPN can be a simple process, but it can also come with some common issues that you may encounter. One common issue is the inability to connect to the new VPN after changing it. This can be due to a variety of reasons, such as an incorrect configuration or incompatible settings. To fix this issue, you may need to check the settings and make sure they match the requirements of the new VPN.
Another issue you may encounter is a slow or unstable connection after changing your VPN. This can be due to factors such as network congestion or the quality of the new VPN service. To solve this issue, you can try switching to a different server location or contacting your new VPN provider’s customer support for assistance.
Lastly, it is important to keep in mind that changing your VPN can also impact any other applications or services that rely on your previous VPN connection. Be sure to update any settings or configurations for these applications to ensure they are still functioning properly with your new VPN.
Tips for Smoothly Changing Your VPN
Changing your VPN can be a daunting task, especially if you are not familiar with the process. However, there are a few tips you can follow to make the process smooth and hassle-free. Firstly, it is important to research the VPNs you are interested in and read reviews from other users. This will help you make an informed decision and choose a VPN that meets your needs.
Before changing your VPN, make sure to disconnect from the current one and shut down any applications that are using it. This will prevent any conflicts during the transition. When installing your new VPN, follow the instructions carefully and make sure to configure the settings correctly.
After installing your new VPN, test it thoroughly to ensure it is working properly. If you encounter any issues, reach out to the VPN provider’s customer support team for assistance. Lastly, always keep your VPN software up to date to ensure it is secure and functioning properly.
By following these tips, you can smoothly change your VPN without any issues and enjoy a secure and private browsing experience.
Troubleshooting VPN Connection Issues: Common Problems and Solutions to Ensure Smooth VPN Changes
Troubleshooting VPN connection issues is essential to ensure a seamless experience when changing your VPN. Common problems may arise during the transition, but with the right solutions, you can maintain a secure and private online presence.
One prevalent issue is a slow or unstable connection. This can occur due to server congestion or network limitations. To resolve this problem, try switching to a different server location, preferably one closer to your physical location. Additionally, ensure your internet connection is stable and functioning correctly.
Another issue users may face is DNS leaks, which can compromise your privacy. To fix this, configure your device to use the VPN’s DNS servers or utilize a reputable VPN client with built-in protection against leaks.
Firewall and antivirus software can sometimes interfere with VPN connections. Adjust your firewall settings to allow VPN traffic and add exceptions for your VPN client in your antivirus software.
Lastly, keep your VPN client updated and ensure it’s compatible with your operating system to prevent compatibility issues. By addressing these common problems and solutions, you can enjoy a trouble-free VPN experience while changing your VPN.
Conclusion: Importance of Changing Your VPN
In conclusion, it is of utmost importance to change your VPN from time to time. This is because VPN services can be subject to various factors that may compromise their effectiveness. For instance, VPN servers can be blocked by websites or services, rendering them useless for accessing specific content. Additionally, some VPN providers may log user data, which may compromise user privacy.
Changing your VPN service regularly ensures that you have access to a range of servers and IP addresses, which can help you bypass restrictions and access content from different locations. Moreover, it can help protect your privacy by minimizing the amount of data that any one VPN provider has on you.
In addition to changing your VPN service, it’s important to consider other factors when selecting a VPN provider, such as the provider’s security protocols, logging policies, and customer support. Ultimately, the importance of changing your VPN cannot be overstated in today’s digital age, where privacy and security are paramount.


