WordPress is one of the most popular CMS in the world. More than 18.9% of all Internet sites work exactly on it, and the number of installations has exceeded 76.5 million. Unfortunately, this popularity has its drawbacks. According to the Securi reports , a company that specializes in websites security, WordPress is the most vulnerable to hacking CMS in the world. However, if you follow the best practices in this regard and perform a few tricks from our guide, you will find that WordPress protection can easily be reinforced with a few simple steps.
Before we start this tutorial, check the following:

- Access to the WordPress control panel
- Access to your on the hosting account (optional)
Step 1 – Maintenance of the current version of WordPress
This will be the first and most important step to improve the WordPress security. If you want a clean site without the malware, you need to make sure that the version of your WordPress relevant. Perhaps this advice seems simple, however, only 22% of all WordPress installations account for the latest version.
WordPress has implemented the Automatic Updates feature in version 3.7, but it works only for small security updates. While large, key updates must be installed manually.
Step 2 – Use of non-standard login credentials
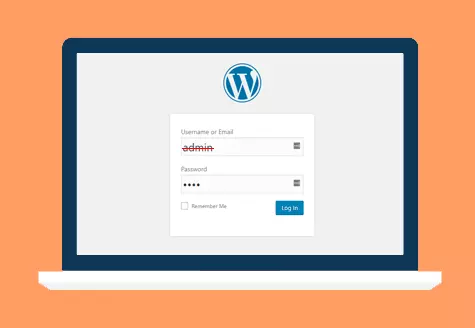
You use the admin, as the name of the administrator in WordPress? If your answer is yes, then you seriously reduce your protection WordPress and simplifies the process of hacking the hackers of your control panel. It is strongly recommended to change the administrator’s user name to something else (check the manual if you are unsure how to do this), or create a new administrator account with other data. Follow these steps if you prefer the second option:
- Log in WordPress dashboard
- Find the section Users and click Add new.
- Create a new user and assign Administrator rights
- Reenter in WordPress with your new data.
- Go back to the Users section and delete the default Admin account.
A good password is playing a key role in the WordPress security. Much harder to crack the password consisting of letters, numbers, lower and upper case and special characters. Tools such as LastPass and 1Password can help in the creation and management of complex passwords. Also, if you ever need to log in to your WordPress control panel when connecting to an unsecured network (such as in coffee shops, public libraries, and so on. D.), Do not forget to secure by using VPN, which will protect your login information.

Step 3 – Enable Two-Step Verification
Two-step verification adds an extra layer of protection to your login page. After confirming the user name, it adds another step that must be completed for a successful login. Chances are you already use it to access mail, online bank and other accounts containing confidential information. Why not use it in WordPress?
While it may seem difficult to include in the WordPress-step verification is easy. All you need is to install a mobile app-step verification, and customize it for your WordPress.
Step 4 – Turn off sending of PHP error reporting
Reports PHP error can be quite useful if you are developing a site and want to make sure that everything is working properly. However, to show all errors, this is a serious omission in the WordPress security.
You need to fix this as soon as possible. Do not worry, you do not need to be a programmer to disable PHP error reports by WordPress. Most providers of hosting services offer this option in the control panel. If not, just add the following lines to your file wp-config.php. You can use the FTP-client or File Manager to edit the wp-config.php file.
error_reporting(0);
@ini_set(‘display_errors’, 0);
That’s all. error reports are disabled.
Step 5 – Do not use the nulled templates for WordPress
Remember “Free cheese is only in a mousetrap.” The same applies nulled templates and plug-ins.
All over the Internet there are thousands nulled plugins and templates. Users can free to download them using various file sharing and torrent files. They do not know that most of them are infected with malware or links black search engine optimization techniques.
Stop use nulled plugins and templates. This is not only unethical, but also harms the security of your WordPress. In the end, do you pay the developer for cleaning your site.
Step 6 – Scanning WordPress for malware
To infect WordPress, hackers often use the holes in the template or plugins. Therefore, it is important to often scan your blog. There are many well written plugins for these purposes. WordFence stands out from this set. It offers guidance on the application and the ability to automatically check, along with a bunch of other different settings. You can even restore the modified / infected files in a couple of clicks. Apply it on a free basis. These facts should be enough to let you set it up right now.
Other popular plugins for WordPress enhance security:
- BulletProof Security – unlike WordFence, which we mentioned earlier, BulletProof does not scan your files, but it gives you a firewall, database protection, etc. A distinctive feature is the ability to configure and install the plug-in a few mouse clicks.
- Sucuri Security – this plugin will protect you from DDOS attacks, it contains a blacklist, scan your site for malware and controlled by your firewall. When it detects something. You will be notified via email. Google, Norton, McAfee – this plugin includes all black lists of these programs. You can find a complete guide on installing plug-ins for WordPress site here.
- VirusTotal – is a free service for checking files and links for malware.
Step 7 – Moving to a safer website hosting
Maybe this advice may seem strange, but statistics show that more than 40% of websites on WordPress have been compromised due to security holes hosting account. These statistics should push you to move to a more secure WordPress hosting.
A few key facts that you need to keep in mind when choosing a new web hosting:
- If this is shared hosting, make sure that your account is isolated from other users, and there is no risk of infection from other sites on the server.
- At present hosting the automatic backup (backup).
- The server is a third-party firewall and tools for scanning.
Step 8 – Make backups as often as possible
Even the largest sites are hacked every day, despite the fact that their owners spend thousands on improving WordPress security.
If you follow the best practices in this regard and used tips from this article, you will still need to make regular backups of your website.
There are several ways to create a backup. For example, you can manually download the website files and export the database, or use the tools offered by your hosting company. Another way to use WordPress plugins. The most popular are:
- VaultPress
- BackUpWordPress
- BackupGuard
You can even automate the process of creating and storing backups WordPress backups to Dropbox.
Step 9 – Edit Shutdown File
As you probably know, WordPress has a built-in editor that allows you to edit PHP files. This feature is as useful as it can be harmful. If hackers gain access to your control panel, the first thing that they will notice is the file editor. Some WordPress users prefer to completely turn off this feature. It can be disabled by editing the wp-config.php file by adding thereto the following code:
define( 'DISALLOW_FILE_EDIT', true );
That’s all you need to disable this feature in WordPress.
Step 10 – Remove unused templates and plug-ins
Make cleaning your site on WordPress, and remove any unused templates and plugins. Hackers often use disconnected and outdated templates and plugins (even the official WordPress plugins) to gain access to your control panel, or download malicious content on your server. Removing plug-ins and templates that you no longer use (and perhaps forgotten update) a long time ago, you reduce risks and make your WordPress site more secure.
Step 11 – Using .htaccess to improve the protection WordPress
.htaccess file is required for correct operation of WordPress links. Without the correct entries in the .htaccess file, you will get a lot of 404 errors.
Not so many people are aware that .htaccess can be used to improve the protection of WordPress. For example, you can block access or disable the execution of PHP in specific folders. Below shows examples of how you can use .htaccess to improve safety on the WordPress site.
Denying access to the administrative part of WordPress
The code below will allow you to gain access to the administrative part of WordPress with only certain IP.
AuthUserFile /dev/null
AuthGroupFile /dev/null
AuthName "WordPress Admin Access Control"
AuthType Basic
<LIMIT GET> order deny,allow
deny from all
allow from xx.xx.xx.xxx
allow from xx.xx.xx.xxx </LIMIT>
Note that you need to change XX.XX.XX.XXX to your IP address. You can use our website to check your current IP. If you use more than one connection to the control site on WordPress, then make sure that you wrote the other IP addresses (add as many addresses as you need). It is not recommended to use this code if you have a dynamic IP address.
Disable execution of PHP in specific folders
Hackers like to download a backdoor scripts in WordPress folder downloads. By default, this folder is used only for storage of media files. Therefore, it should not contain any PHP files. You can easily disable the execution of PHP, creating a new .htaccess file in the / wp-content / uploads / to such rules:
<Files *.php>

deny from all

</Files>
Protecting the file wp-config.php
wp-config.php file contains the core WordPress options and details of the MySQL database. Therefore, it is the most important file to WordPress. Therefore, it often becomes the main purpose WordPress hackers. However, you can easily secure it using the following rules in .htaccess:
<files wp-config.php>

order allow,deny deny from all

 </files>
Step 12 – Changing the default WordPress database prefix to prevent the introduction of SQL-code
WordPress database contains data and stores in itself all the key information necessary to operate your site. As a result, it becomes another target of hackers and spammers that perform automated code for the implementation of SQL-code. During installation of WordPress, many people do not bother changing the default database prefix wp_. According WordFence, 1 of 5 WordPress breakings associated with the introduction of SQL-code. Since wp_ is one of the standard values, first hackers to begin with him. At this stage, we will briefly look at how to protect WordPress site from such attacks.
Changing the prefix table to an existing site by WordPress
Part One – Changing the prefix in wp-config.php
Find your wp-config.php file using an FTP client or File Manager, locate the line with a value of $ table_prefix.

You can add additional numbers, letters or underscores. After that, save the changes and go to the next step in this guide we use wp_1secure1_, as a new table prefix.
While you are in your wp-config.php file, and find the name of your database in order to know what kind of change. Search the section define ( ‘DB_NAME’.

Part Two – Upgrade all database tables
Now you need to update all the records in your database. This can be done using phpMyAdmin.
Find a specific database in the first part and then log on.
By default, WordPress installation has 12 tables and each needs to be updated. However, this can be done quickly using SQL section in phpMyAdmin.
Change each table to manually take a huge amount of time, so we use SQL queries to speed up the process. Use the following syntax to update all of the tables in your database:
RENAME table `wp_commentmeta` TO `wp_1secure1_commentmeta`;
RENAME table `wp_comments` TO `wp_1secure1_comments`;
RENAME table `wp_links` TO `wp_1secure1_links`;
RENAME table `wp_options` TO `wp_1secure1_options`;
RENAME table `wp_postmeta` TO `wp_1secure1_postmeta`;
RENAME table `wp_posts` TO `wp_1secure1_posts`;
RENAME table `wp_terms` TO `wp_1secure1_terms`;
RENAME table `wp_termmeta` TO `wp_1secure1_termmeta`;
RENAME table `wp_term_relationships` TO `wp_1secure1_term_relationships`;
RENAME table `wp_term_taxonomy` TO `wp_1secure1_term_taxonomy`;
RENAME table `wp_usermeta` TO `wp_1secure1_usermeta`;
RENAME table `wp_users` TO `wp_1secure1_users`;
Some WordPress templates and plug-ins can add additional tables in the database. If you have more than 12 tables in a MySQL database, add the rest of them manually in the SQL query and execute it.
Part Three – Check the options and custom metadata tables
Depending on the number of plug-ins you have installed, some of the values in your database must be updated manually. This can be done by running some SQL queries on the table options and metadata.
For a table of options, you should use:

SELECT * FROM `wp_1secure1_options` WHERE `option_name` LIKE `%wp\_%`
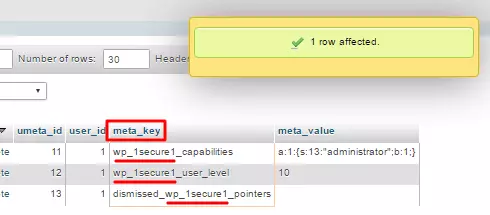
For table metadata, you should use:
SELECT * FROM `wp_1secure1_usermeta` WHERE `meta_key` LIKE `%wp\_%`
When you get the results of a query, simply update all values wp_ your new customized prefix. User metadata table you need to edit meta_key field, whereas for the option, you must change the value option_name.
Securing your new WordPress installations
If you plan to install a new WordPress site, you do not need to re-execute the process. You can easily change the WordPress table prefix during installation:
Congratulations! You have successfully improved the security of your database from the introduction of SQL-code.
Conclusion
Despite the fact that WordPress is the CMS breaks open in the world, to improve its defense is not so hard. In this guide, we told you about 12 tips that you should follow to protect WordPress website.