Introduction: Why You Might Want to Disable Notifications on Windows 10
If you’ve ever felt overwhelmed by the constant barrage of notifications on your Windows 10 device, you’re not alone. From email alerts to social media updates to system messages, it can be difficult to stay focused on the task at hand with so many distractions vying for your attention.
Fortunately, Windows 10 provides several options for managing and disabling notifications. By taking advantage of these features, you can reduce the number of interruptions you receive and create a more productive, less distracting work environment.
In this article, we’ll explore some of the reasons why you might want to disable notifications on Windows 10, and we’ll provide step-by-step instructions for various methods you can use to manage your notifications. Whether you’re looking to improve your concentration during work or simply want a more peaceful computing experience, disabling notifications can help you achieve your goals.
Method 1: Disable Notifications for Individual Apps
If you want to disable notifications for a specific app in Windows 10, you can do so by accessing the app’s settings. This method is especially useful if there’s a particular app that’s particularly noisy or distracting, and you only want to silence its notifications.
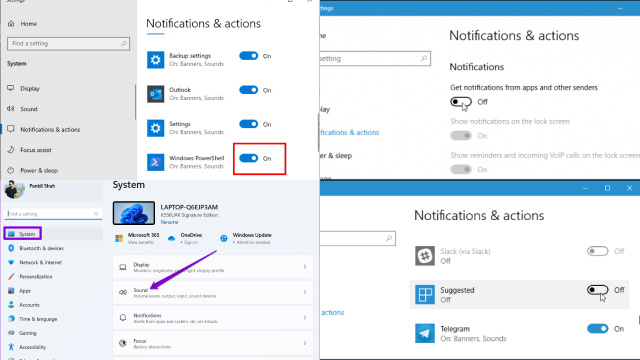
To get started, open the Start menu and click on the gear icon to access the Settings app. From there, click on “System” and then “Notifications & actions”. Scroll down until you see a list of apps that can send notifications, and select the app you want to disable.
In the app’s settings, you’ll see a toggle switch labeled “Get notifications from this app”. Simply slide the switch to the “Off” position, and you’re done! The app will no longer send you notifications until you turn them back on.
By using this method, you can customize your notifications settings to your liking, giving you more control over how you receive alerts and updates on your Windows 10 device.
Method 2: Disable All Notifications in Windows 10 Settings
If you find that notifications on your Windows 10 device are too distracting or overwhelming, you can disable all notifications at once using the Windows 10 Settings app. This method is ideal if you want a break from all notifications, or if you need to focus on a particular task without interruptions.
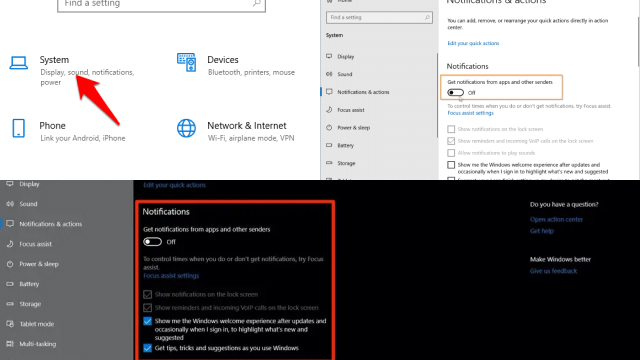
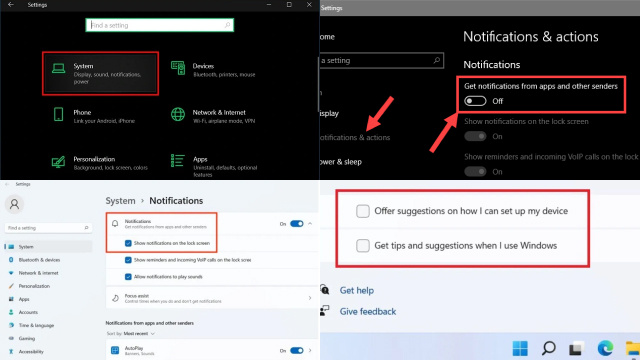
To disable all notifications, open the Settings app from the Start menu and click on “System”. From there, select “Notifications & actions” and toggle the switch next to “Get notifications from apps and other senders” to the “Off” position.
Once you’ve disabled all notifications, you won’t receive any alerts or updates from apps, system messages, or other sources until you turn notifications back on.
This method provides a quick and easy way to take a break from notifications, giving you the freedom to work, study, or relax without interruptions.
Method 3: Use Quiet Hours to Temporarily Disable Notifications
If you want to temporarily disable notifications on your Windows 10 device, you can use the “Quiet Hours” feature. This method is ideal if you need to focus on a specific task for a set period of time, such as studying for an exam or preparing for a presentation.
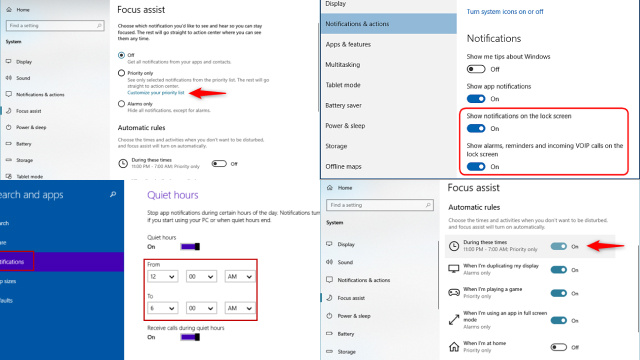
To use Quiet Hours, click on the Action Center icon in the bottom right corner of the screen and select the “Quiet Hours” button. Alternatively, you can open the Settings app, click on “System”, and select “Focus assist”. From there, choose the “Alarms only” or “Priority only” option to temporarily silence notifications.
During Quiet Hours, notifications will be silenced except for priority alerts, such as alarms or messages from specified contacts. Once Quiet Hours are over, notifications will resume as usual.
By using the Quiet Hours feature, you can create a distraction-free work environment when you need it, without permanently disabling notifications on your Windows 10 device.
Method 4: Customize Notification Settings for Focus Assist
Focus Assist is a useful feature in Windows 10 that helps minimize distractions by blocking notifications and alerts during specific times or activities. However, there may be times when you want to receive notifications for certain apps or contacts even when Focus Assist is turned on. That’s where customizing notification settings for Focus Assist comes in.
To customize your notification settings for Focus Assist, first, open the Settings app and navigate to System > Focus Assist. From there, you can select the priority list, which allows notifications from specific people, apps, or accounts to come through. You can also choose to allow alarms or set up automatic rules for Focus Assist to turn on during specific times or activities.
By customizing your notification settings for Focus Assist, you can ensure that you don’t miss important messages or alerts while still minimizing distractions during your work or leisure time.
Method 5: Turn Off Notification Sounds and Banners
If you find notification sounds and banners to be distracting, you may want to consider turning them off. Doing so can help you stay focused on your work or activities without being interrupted by constant alerts.
To turn off notification sounds and banners in Windows 10, first, open the Settings app and navigate to System > Notifications & actions. From there, you can choose to turn off sounds for individual apps or turn off all notification sounds altogether. You can also choose to hide notification banners, which are the pop-up notifications that appear on your screen.
By turning off notification sounds and banners, you can still receive important alerts and messages without being constantly distracted by their sounds and visuals. This can help you be more productive and focused, especially if you are working on a task that requires your full attention.
Method 6: Disable Notifications for a Specific Time Period
If you need to focus on a task for a specific amount of time, you may want to disable all notifications during that period. Windows 10 allows you to do just that, thanks to its “Quiet Hours” feature.
To disable notifications for a specific time period, first, open the Action Center by clicking on the icon in the lower right corner of your screen or by pressing the Windows key + A. From there, click on the “Quiet Hours” button to turn on this feature. You can then choose the start and end times for Quiet Hours to automatically turn on and off.
During Quiet Hours, all notifications will be disabled, including those from apps and contacts on your priority list. This can help you focus on your work without being interrupted by constant alerts.
Once the specified time period has ended, notifications will resume as normal.
Conclusion: Enjoy a Quieter, More Focused Windows 10 Experience
In today’s world of constant notifications and distractions, it can be difficult to stay focused on the task at hand. However, by utilizing the built-in tools and features of Windows 10, you can enjoy a quieter, more focused experience.
Customizing your notification settings, turning off notification sounds and banners, and disabling notifications for a specific time period are just a few of the methods you can use to minimize distractions and improve your productivity. By taking advantage of these features, you can ensure that you are only receiving the notifications that are truly important to you, and that you are able to concentrate on your work or leisure activities without interruption.
So if you are tired of being constantly distracted by notifications, give these methods a try and see how they can help you achieve a more peaceful and productive Windows 10 experience.


