Exploring Windows 11 BIOS: A Step-by-Step Guide
Windows 11 BIOS provides a gateway to advanced system configurations and settings. To navigate this crucial component effectively, follow this step-by-step guide:
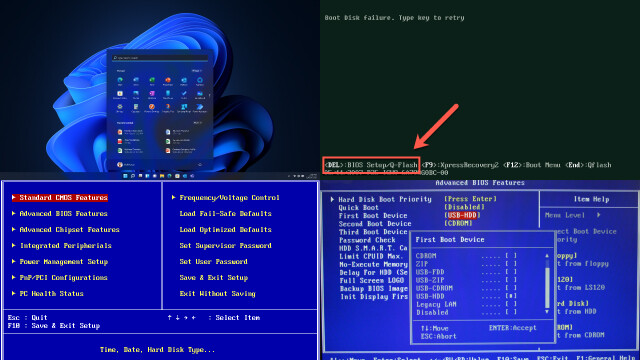
- Start Your PC: Power on your Windows 11 computer and wait for the manufacturer’s logo to appear.
- Access BIOS: Press the designated key (commonly Del, F2, or Esc) repeatedly during the boot process to enter the BIOS setup.
- Familiarize with BIOS Interface: Once inside BIOS, explore the various menus and options using the keyboard. Be cautious as any changes made here can impact your system.
- Customize Settings: Adjust settings such as boot order, hardware configurations, and security features to optimize your PC’s performance and functionality.
- Save and Exit: After making changes, save the settings and exit the BIOS setup. Your computer will restart with the new configurations in effect.

By following this step-by-step guide, you can confidently explore and utilize the Windows 11 BIOS, unlocking a world of customization and control over your PC.
The Ultimate Guide to Accessing BIOS in Windows 11
Accessing the BIOS in Windows 11 is essential for advanced system configuration and troubleshooting. Follow this ultimate guide to seamlessly access the BIOS on your Windows 11 computer:
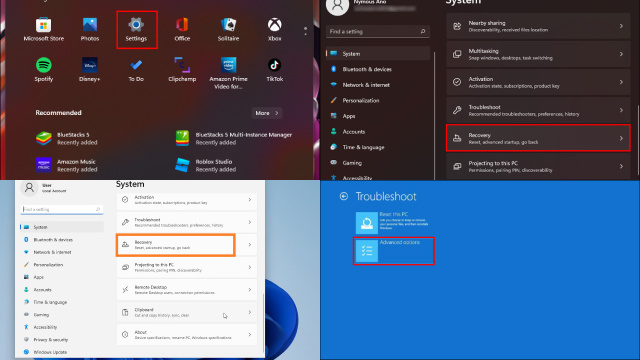
- Restart Your PC: From the Start menu, click on the Power button and select Restart while holding the Shift key.
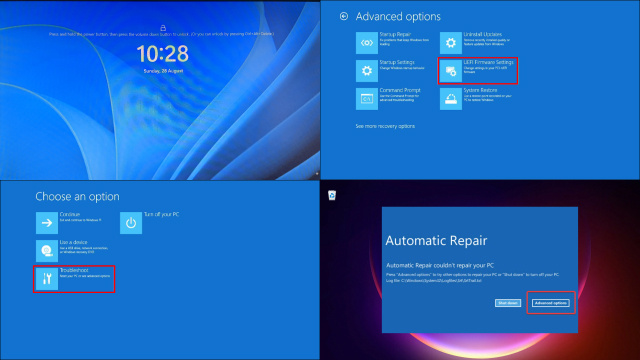
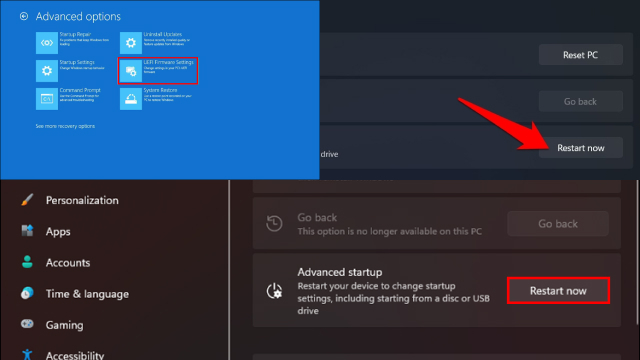
- Enter Advanced Startup: Once your PC restarts, navigate to Troubleshoot > Advanced options > UEFI Firmware Settings.
- Access the BIOS: Click on the Restart button and wait for your computer to restart again, this time directly into the BIOS.
- Navigate BIOS Menus: Use the keyboard to navigate through the BIOS menus and explore various settings and configurations.
- Save and Exit: After making any changes, remember to save the settings and exit the BIOS to apply the modifications.
By following this ultimate guide, you can confidently access and navigate the BIOS in Windows 11, empowering you to customize and optimize your computer’s performance.
Windows 11 BIOS provides access to critical system settings that can enhance your computer’s performance. This comprehensive tutorial will guide you through the process of navigating the BIOS in Windows 11:
- Power Up Your PC: Start your Windows 11 computer and press the designated key (commonly Del, F2, or Esc) repeatedly during startup to enter the BIOS.
- Familiarize with BIOS Interface: Once inside the BIOS, explore the different menus and options using your keyboard. Take your time to understand the layout and available settings.
- Customize System Settings: Navigate through the various sections, such as boot options, security settings, and hardware configurations. Make changes as needed, ensuring you understand the impact of each modification.
- Save and Exit: After adjusting the settings, save your changes and exit the BIOS. Your computer will reboot with the new configurations in effect.

By following this comprehensive tutorial, you can confidently navigate the Windows 11 BIOS, empowering you to optimize your system and unlock its full potential.
Mastering BIOS Access in Windows 11: Tips and Tricks
Mastering BIOS access in Windows 11 allows you to have greater control over your computer’s hardware and settings. Here are some tips and tricks to help you navigate and make the most of your BIOS:
- Know Your Key: Familiarize yourself with the key required to access BIOS during system startup. It is often displayed on the manufacturer’s splash screen.
- Timing is Key: Press the designated key at the right moment during the boot process. Timing can vary, so be ready to press the key repeatedly.
- Read the Manual: Consult your computer’s manual or manufacturer’s website for specific BIOS instructions and options related to your device.
- Take Caution: Make changes in BIOS settings with caution. Be aware of the impact each change can have on your system’s stability and performance.
- Keep a Record: Take note of any changes you make in BIOS, especially when tweaking advanced settings, so you can revert or troubleshoot if needed.
By mastering BIOS access in Windows 11 with these tips and tricks, you can confidently optimize your computer’s performance and customize settings to suit your needs.
Unlocking the Power of Windows 11 BIOS: A User’s Manual
The Windows 11 BIOS is a powerful tool that allows you to customize and optimize your computer’s performance. This user’s manual will help you unlock the full potential of Windows 11 BIOS:
- Accessing BIOS: Restart your computer and press the designated key during startup to enter the BIOS interface.
- Exploring Menus: Navigate through the BIOS menus using your keyboard to access various settings and configurations.
- System Configuration: Customize boot options, enable or disable hardware components, and adjust system timings to enhance performance.
- Security Settings: Set up password protection, enable secure boot, and manage device encryption for added security.
- Monitoring and Diagnostics: Check hardware health, monitor system temperatures, and review system logs for troubleshooting purposes.
- Firmware Updates: Stay up-to-date by checking for and installing the latest BIOS firmware updates provided by your computer manufacturer.

By following this user’s manual, you can harness the power of Windows 11 BIOS to optimize your computer’s performance, enhance security, and stay in control of your system.
Step Up Your Windows 11 Experience: Accessing BIOS Made Easy
Accessing the BIOS in Windows 11 is a vital step in optimizing your computer’s performance. Follow these easy steps to effortlessly access the BIOS and step up your Windows 11 experience:
- Restart Your Computer: Click on the Start menu and select Restart while holding the Shift key.
- Choose Troubleshoot: Once your computer restarts, navigate to Troubleshoot > Advanced options.
- Enter UEFI Firmware Settings: Click on UEFI Firmware Settings to enter the BIOS interface directly.
- Explore BIOS Settings: Familiarize yourself with the available settings and options. Take your time to understand the purpose of each setting.
- Save and Exit: After making any desired changes, save the settings and exit the BIOS. Your computer will restart with the new configurations applied.
By following these easy steps, accessing the BIOS in Windows 11 becomes a breeze, allowing you to optimize your system and elevate your Windows 11 experience to new heights.
Enhancing System Configuration: The Art of Accessing BIOS in Windows 11
Accessing the BIOS in Windows 11 opens the door to advanced system configuration and optimization. Mastering this art allows you to fine-tune your computer’s performance and customize settings to suit your needs. Here’s how to navigate the BIOS in Windows 11:
- Power Up: Start your Windows 11 computer and look for the key prompt displayed during boot-up (commonly Del, F2, or Esc).
- Enter BIOS: Press the designated key repeatedly to access the BIOS interface.
- Explore Settings: Within the BIOS, navigate through the menus and options to discover various system configuration settings.
- Customize Performance: Adjust parameters like boot order, memory settings, and CPU clock speeds to enhance overall system performance.
- Save and Reboot: Once you’ve made desired changes, save the settings and exit the BIOS. Your computer will restart with the new configurations applied.

By embracing the art of accessing BIOS in Windows 11, you can elevate your system’s performance and tailor it to your specific requirements. Experiment, optimize, and unlock the full potential of your computer.
Empower Your PC Settings: Accessing BIOS in Windows 11 for Advanced Users
Accessing the BIOS in Windows 11 empowers advanced users to take control of their PC settings and unlock additional capabilities. Here’s how advanced users can navigate the BIOS in Windows 11:
- Power On: Start your Windows 11 PC and be ready to press the designated key (usually Del, F2, or Esc) repeatedly during startup.
- Enter BIOS: Once the BIOS screen appears, explore the various menus and settings available, ranging from hardware configurations to overclocking options.
- Customize Performance: Fine-tune CPU, RAM, and GPU settings to optimize your PC’s performance for demanding tasks like gaming, content creation, or virtualization.
- Advanced Features: Dive into advanced features such as secure boot, virtualization settings, and power management options to tailor your PC to your specific needs.
- Save and Exit: After making changes, save your settings and exit the BIOS. Your PC will restart with the new configurations in place.
By accessing the BIOS in Windows 11, advanced users can unleash the full potential of their PC, allowing for personalized configurations and enhanced performance tailored to their specific requirements.
