How to Setup VPN on Windows 8
This article is comprehensive in covering all the anticipated configurations and organizational requirements for setting up a VPN connection through your Internet Provider or the corporate server for work-related situations.
Our purpose here is to show you how to create, edit, and delete these VPN connections as the need arises.

These “How to” instructions apply only to the Windows 8 operating system and are not useful in setting up VPN connections on any other operating system.
Preparation
There is system network information you need to have available to identify your originating server and IP address before you begin the process of setting up the VPN connection. There are VPN apps that will do this for you automatically, and some that don’t.
If you want to make this a more straightforward task, use a VPN app that does the heavy lifting to get your VPN connection up and running.
- You need to know the domain name and IP address you are trying to connect to create a VPN connection. For example, you must have this information ready when you create your VPN connection to the server if you work for a company named Contoso. We will need this info as we walk through the screenshots presented below.
-
- Let’s call the Contoso VPN server VPN1.contoso.com at IP address 10.0.0.25
- If you’re doing this from your home computer and going through and Internet provider, choose a VPN server from the ones available through your VPN app.
- You will need your username and password
- You must be connected to the Internet to connect to a VPN server at your company or the one you are going to communicate with via tunneling and encrypting via your Internet provider.
- Some companies require the use of a smart card. You may need a smart card reader connected to your computer before you attempt to connect to your company.
- Private Internet providers do not typically use smart cards or intermediate identification devices. Your username and password should suffice.
Using the Desktop to Establish a new VPN connection
To create a new VPN connection
- Locate and right-click on the Network icon in the taskbar. The network icon can typically be found on the right side of the bottom Windows taskbar. Click Open Network and Sharing Center to open the Network and Sharing Center.
- Look for Change your networking settings option in the Network and Sharing Center. Tap the Set up a new connection or network to open the Set up a Connection or Network
- Pick Choose a connection option, click Connect to a workplace, and then click
- Now, let’s configure the How do you want to connect option. Start by clicking on the Use my Internet connection (VPN)
- The configuration wizard will ask you to either select the corporate VPN option you just set up or create a different VPN connection. So, choose the one you see, create a new VPN, or do nothing.
- Type the Internet address to connect to, Internet address, type the IP address of the VPN server to which you want to connect. On the Destination nameoption, give the VPN connection a name you will recognize for easier identification later. Choose something like a Contoso VPN connection for your company VPN server or FlashVPN for your private VPN server. Don’t forget to check any checkboxes to tailor your situation to your needed configuration.
- Now, you are ready to click Create. This activates the VPN connection, and you should now see the newly configured VPN network connection on the Networks
Connect using VPN
The easiest way to access the configured VPN connection from the Desktop is to left-click the network icon in the system tray. The left-click opens the Networks sidebar and displays your VPN connection.
To connect, left-click the VPN connection, and then click Connect, Network Authentication. Type your username using the format, DOMAIN\User name. Enter the password, and you are tunneling through the server using encrypted data.
Using the Start screen to Create a new VPN connection
In Windows 8, the Get Connected Wizard is another method to configure a VPN profile. To launch the wizard, use the Start button and then tap the SETTINGS icon—type VPN in the Settings window. Now, tap the Set up a virtual private network (VPN) connection.
Once you click on the Set Up a Virtual Private Network (VPN) Connection, the dialog box in figure 2, Create a VPN Connection, will pop up.
Enter the information in each block from the information you gathered in the preparation phase discussed earlier. Remember that the IP address or the fully qualified domain name of the Remote Access server can be used.
If, by chance, you’ve already configured a VPN connection, jump down to figure 8 and follow those steps to find the domain name or IP address.
You can also instruct the computer to remember your VPN credentials by using the checkbox Remember Credentials, following your first successful connection attempt.
As mentioned in the introduction to this article, the Get Connected Wizard is an automated procedure that handles many of the manual settings you’ve been entering and remembers them using registry entries.
For that reason, authentication and tunneling protocols are automatically negotiated between the VPN server and your computer using the START button method. Once these protocols are arranged, they can be edited using the Connection Properties dialog box (discussed later)
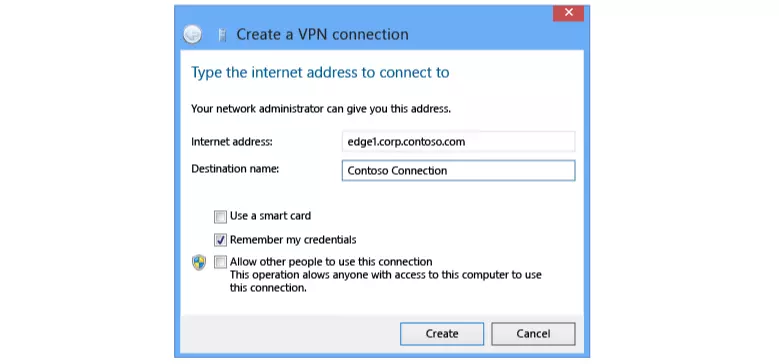
Figure 1: Wizard Screen One
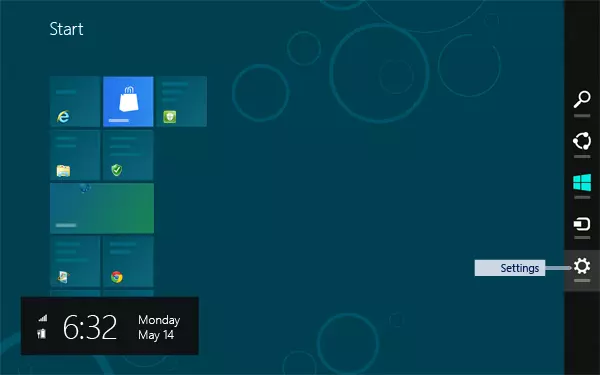
Figure 2: Charms Bar Dialog Box
Using an Existing Corporate Network VPN Connection
- Open the Charmsdialog box by moving the cursor to the top or bottom right corner of your computer screen. It can also be accessed using the Win+C keyboard keys pressed simultaneously.
- Click Settings then the network icon that is displayed in the bottom right corner of the screen.

Figure 3
- In Networks, select the desired VPN connection. Then click Connect
 Figure 4
When you click Connect, using your saved credentials, a connection is negotiated with the server. If you did not put a checkmark in the Remember Credentials while configuring the connection, you would have to enter them manually.
If your credentials have been changed, you can clear the cached credentials by right-clicking the connection and choose the Clear Cached Credentials option.

Figure 5: Network Authentication Credentials
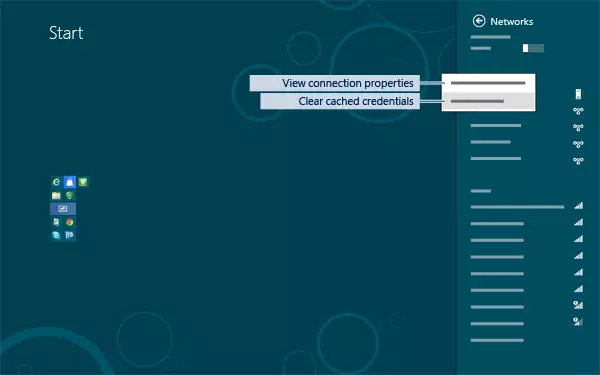
Figure 6: View and Clear Credentials
Editing VPN Credentials
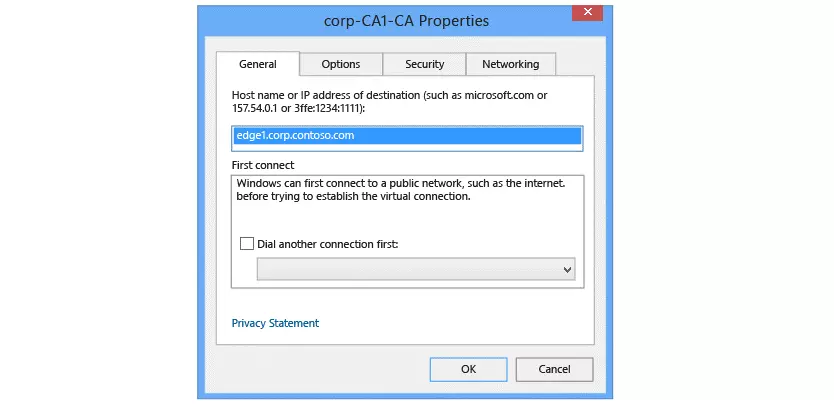
Figure 7: Connection Properties
Connection Properties has four tabs. Click each tab in sequence from left to right and do the following:To edit a VPN connection that you have already configured, right-click the connection, and then select the VPN connection properties. To access Connection Properties, in the Networks view, click View Connection Properties to bring up the dialog box (figure 8).
- General Tab
Change the VPN server hostname or IP address, and configure an interface to a public network.
- Options
Configure point-to-point protocol (PPP) settings and enable or disable caching of credentials.
- Security
Configure tunnels, authentication, and encryption settings.
- Networking
Configure transports (or protocols). The most common protocols are TCP/IPv4 and TCP/IPv6.
Delete a connection
On the Start screen, click Search in Charms, type VPN, and then click View Network Connections under Settings.
Right-click a VPN connection, and then click Delete.
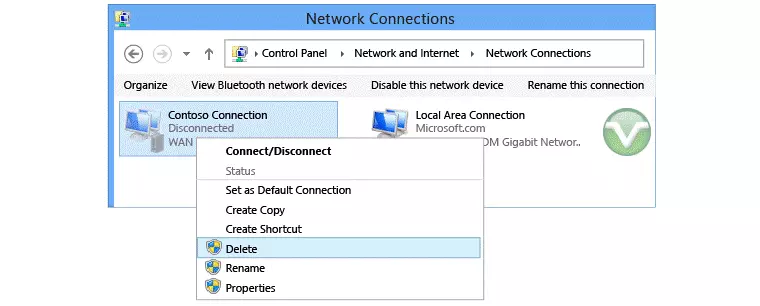
Figure 8: Deleting a connection

Troubleshooting Common VPN Setup Issues on Windows 8
Troubleshooting common VPN setup issues on Windows 8 can help ensure a seamless and secure connection. Here are some frequent problems users may encounter and their solutions:

- Connection Failures: If your VPN connection isn’t established, double-check the accuracy of your server address, username, and password. Ensure you have a stable internet connection.
- Protocol Compatibility: Some VPN providers support specific protocols. Ensure your VPN client and server are using compatible protocols. Common options include PPTP, L2TP, and OpenVPN.
- Firewall Interference: Windows Firewall or third-party firewall software can block VPN traffic. Configure your firewall settings to allow VPN traffic or temporarily disable the firewall for testing purposes.
- Outdated VPN Client: Ensure you’re using the latest version of your VPN client software. Updates often include bug fixes and compatibility improvements.
- VPN Server Status: Verify that your VPN server is operational. If it’s down or experiencing issues, you won’t be able to establish a connection.
- Network Adapter Issues: Sometimes, the network adapter used for the VPN connection can malfunction. Restart it by disabling and enabling the adapter in the Network and Sharing Center.
- DNS and IP Address Problems: Incorrect DNS or IP settings can prevent proper VPN connectivity. Ensure that your VPN client is set to obtain DNS and IP addresses automatically.
- VPN Client Configuration: Review your VPN client’s settings, including authentication and encryption settings. Ensure they match the settings provided by your VPN service.
- Administrator Rights: Some VPN configurations require administrator privileges to set up correctly. Ensure you have the necessary permissions to configure the VPN.
- Log Analysis: Check the VPN logs for error messages or warnings. These logs can provide valuable information about the cause of connection issues.

By addressing these common problems and following the troubleshooting steps, you can resolve VPN setup issues on Windows 8 and establish a secure and reliable VPN connection for your online activities.
Setting Up A VPN Connection in Windows 8.1
With the introduction of the 8.1 operating system, Microsoft greatly enhanced the internal capabilities of setting up a VPN connection. The wizards and other infrastructure of Windows 8 were upgraded significantly. The entire process involves selecting the correct commands from the Control Panel and follow the steps in the order given.
Is a link to an online tutorial that will take you from beginning to end in less than five minutes, including how to deal with any errors you might encounter. In the tutorial, you’ll recognize many of the same features you saw in Windows 8, but in a much more streamlined and smooth execution.
All the guesswork is removed, giving you a much better chance for success. The source is avoiderrors
1 Comment
Thanx a lot! But a couple of screenshots will be appreciated -)