Understanding Guided Access: A Brief Overview and Its Benefits
Guided Access is a powerful accessibility feature available on iOS devices that allows users to limit the functionality of their device to a single app and restrict certain features. This feature is particularly useful for parents, teachers, or anyone who wants to control the device’s usage in specific situations.
By enabling Guided Access, you can lock the device to a specific app, disable touch input on certain areas of the screen, and even limit the volume control. This ensures that users stay focused on a particular task or content without distractions or accidental app switches.

Some of the key benefits of Guided Access include increased productivity, improved focus, and enhanced accessibility for individuals with cognitive or attention-related challenges. Whether it’s studying, presenting, or simply safeguarding your device, Guided Access offers a flexible solution for customizing and controlling the user experience on your iOS device.
Step-by-Step Guide: Turning Off Guided Access on Your Device
If you’ve enabled Guided Access on your device and want to turn it off, the process is straightforward. Here’s a step-by-step guide to help you disable Guided Access:
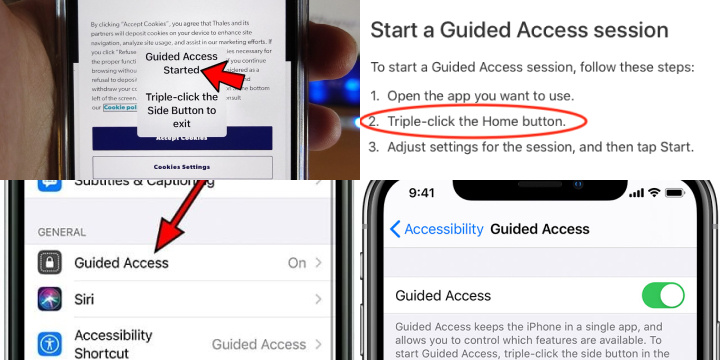
- Triple-press the Home button (or the Side button on newer devices) to access the Guided Access options.
- Enter your passcode or use Touch ID/Face ID authentication to proceed.
- Tap the “End” button located at the top left corner of the screen.
- If you’ve set a passcode specifically for Guided Access, enter it to disable the feature completely.
- The device will exit Guided Access mode, and you’ll regain full access to all apps and features.
By following these simple steps, you can easily turn off Guided Access on your device. This allows you to return to normal usage without any restrictions.
Exploring the Guided Access Settings: Finding the Option to Disable it
If you’ve enabled Guided Access on your iOS device and are now looking to disable it, you can easily find the option within the settings. Here’s how to explore the Guided Access settings and find the option to disable it:
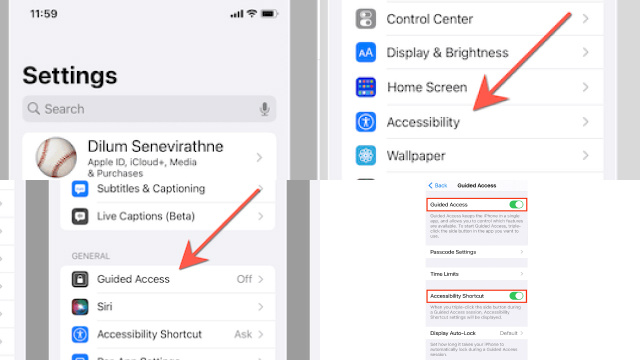
- Open the “Settings” app on your device.
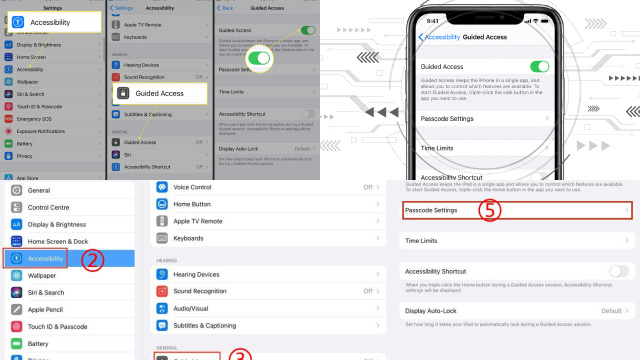
- Scroll down and tap on “Accessibility.”
- In the Accessibility menu, locate and tap on “Guided Access.”
- Here, you’ll find various options to customize Guided Access settings.
- To disable Guided Access, toggle the switch next to “Guided Access” to the off position.
- You may be prompted to enter your passcode or use biometric authentication to confirm the changes.

By exploring the Guided Access settings and finding the option to disable it, you can regain unrestricted access to your device and apps. Take control of your device’s accessibility features and customize them according to your needs.
Deactivating Guided Access: Simple Methods for Disabling the Feature
If you no longer require Guided Access on your iOS device and want to disable it, there are a few simple methods you can use. Here are the steps to deactivate Guided Access:
- Triple-press the Home button (or the Side button on newer devices) to access the Guided Access options.
- Enter your passcode or use Touch ID/Face ID authentication to proceed.
- Tap on “Options” located at the bottom left corner of the screen.
- In the Options menu, tap on “End” to exit Guided Access.
Alternatively, you can disable Guided Access by going to the Settings app, selecting “Accessibility,” then “Guided Access,” and toggling off the switch next to “Guided Access.”
By following these simple methods, you can easily deactivate Guided Access and regain full access to your device without any restrictions.
Troubleshooting: Common Issues When Turning Off Guided Access
While turning off Guided Access on your iOS device is usually a straightforward process, you may encounter some common issues along the way. Here are a few troubleshooting tips to help you address these problems:
- Forgotten passcode: If you’ve forgotten the passcode for Guided Access, you can try a few options. Restart your device and see if that resolves the issue. If not, you may need to reset your device to factory settings, which will erase all data.
- Unresponsive Home or Side button: If the Home or Side button doesn’t respond to triple-presses, ensure that it’s not physically damaged or stuck. You can try using the AssistiveTouch feature as an alternative method to access Guided Access options.
- Settings unresponsive: If you’re unable to access Guided Access settings through the Settings app, restart your device and try again. If the issue persists, consider updating your iOS version or contacting Apple Support for further assistance.

By following these troubleshooting tips, you can overcome common issues when turning off Guided Access and ensure a smooth and hassle-free experience on your iOS device.
Turning Off Guided Access Temporarily vs. Permanently: Which Option to Choose?
When it comes to Guided Access on your iOS device, you have the option to turn it off temporarily or permanently. But which option should you choose? Let’s explore the differences:
- Temporarily turning off Guided Access: This option allows you to disable Guided Access for a specific session while keeping the feature available for future use. It’s useful when you only need temporary access to other apps or features and plan to re-enable Guided Access later.
- Permanently turning off Guided Access: If you no longer require the restrictions and want to completely disable Guided Access, choosing this option is more suitable. It permanently disables the feature until you manually enable it again.
Consider your specific needs and usage patterns to determine which option aligns best with your requirements. Whether it’s temporary flexibility or a permanent removal of restrictions, the choice ultimately depends on your preferences and circumstances.
Resetting Guided Access Passcode: A Solution if You’ve Forgotten it
Forgetting the Guided Access passcode on your iOS device can be frustrating, but there is a solution to regain access. Here’s how to reset the Guided Access passcode:
- Open the “Settings” app on your device.
- Navigate to “Accessibility” and tap on “Guided Access.”
- Tap on “Set Passcode” and then select “Forgot Passcode.”
- You’ll be prompted to authenticate with your device passcode or biometric authentication.
- After authentication, you can set a new passcode for Guided Access.

Keep in mind that resetting the Guided Access passcode will remove any restrictions currently set. It’s important to choose a passcode that is memorable yet secure to ensure you can easily manage Guided Access in the future.
By following these steps, you can reset your Guided Access passcode and regain control over the feature on your iOS device.
Best Practices: When and How to Utilize Guided Access on Your Device
Guided Access is a valuable tool that can enhance your device’s accessibility and focus. Here are some best practices to consider when and how to utilize Guided Access effectively:
- Distraction-free study or work sessions: Enable Guided Access to limit access to specific apps, ensuring you stay focused and minimize distractions.
- Child supervision: When handing your device to a child, activate Guided Access to restrict access to certain apps or features, providing a safe and controlled environment.
- Public presentations: Utilize Guided Access to lock your device to a presentation app, preventing accidental exits or unauthorized access during important presentations.
- Special needs support: Guided Access can assist individuals with cognitive or attention-related challenges by limiting access to specific apps and functions.
To enable Guided Access, go to “Settings,” select “Accessibility,” and then “Guided Access.” From there, you can customize the settings and set a passcode.
By following these best practices, you can maximize the benefits of Guided Access and create a more focused and controlled experience on your device.
Disabling Guided Access: A Quick Troubleshooting Guide
Guided Access is a helpful feature on iOS devices that allows users to restrict the functionality of their device for specific tasks or apps, making it ideal for educational or accessibility purposes. However, there may come a time when you need to disable Guided Access, and this quick troubleshooting guide will walk you through the process.
- Start with a Triple-Click: Typically, Guided Access can be exited by triple-clicking the device’s Home or Side button, depending on the model. This simple step often does the trick.
- Enter the Passcode: If a passcode was set up for Guided Access, you’ll need to enter it to exit the mode. Make sure you remember this passcode or have it handy.
- Try AssistiveTouch: If you’re having trouble with the physical buttons, you can enable AssistiveTouch in the Accessibility settings. This on-screen touch interface can be used to exit Guided Access.
- Restart the Device: Sometimes, a quick restart can resolve any issues with Guided Access. Simply power off and then on your device.
- Update iOS: Ensure your device is running the latest iOS version, as updates often include bug fixes and improvements that can address Guided Access issues.
- Contact Apple Support: If none of the above steps work, reach out to Apple Support for personalized assistance.

By following these troubleshooting steps, you can quickly and effectively disable Guided Access when needed, ensuring a smooth user experience on your iOS device.
